

Let's Roll - Create your First 3D Game in Godot
In this tutorial I will walk you through creating your first 3D game in Godot.
(you can try playing it in browser here).
Prerequisites
- You need to understand the fundamentals of programming (if/else, class, function, etc).
- You need to be familiar with Godot UI and some basic concepts like scenes and nodes. You need to be able to create and save scenes, add nodes, edit node settings, connect signals.
If you get confused at any point, just ask questions in our discord server or in the reddit comments.
Download Project Files
First, download the project files:
lets-roll-assets.zipcontains the initial assets you need to build the game (models for the ball and the level).lets-roll-final.zipcontains the completed project you can use as reference if you get stuck at any point.
Create a New Project and Import the Assets
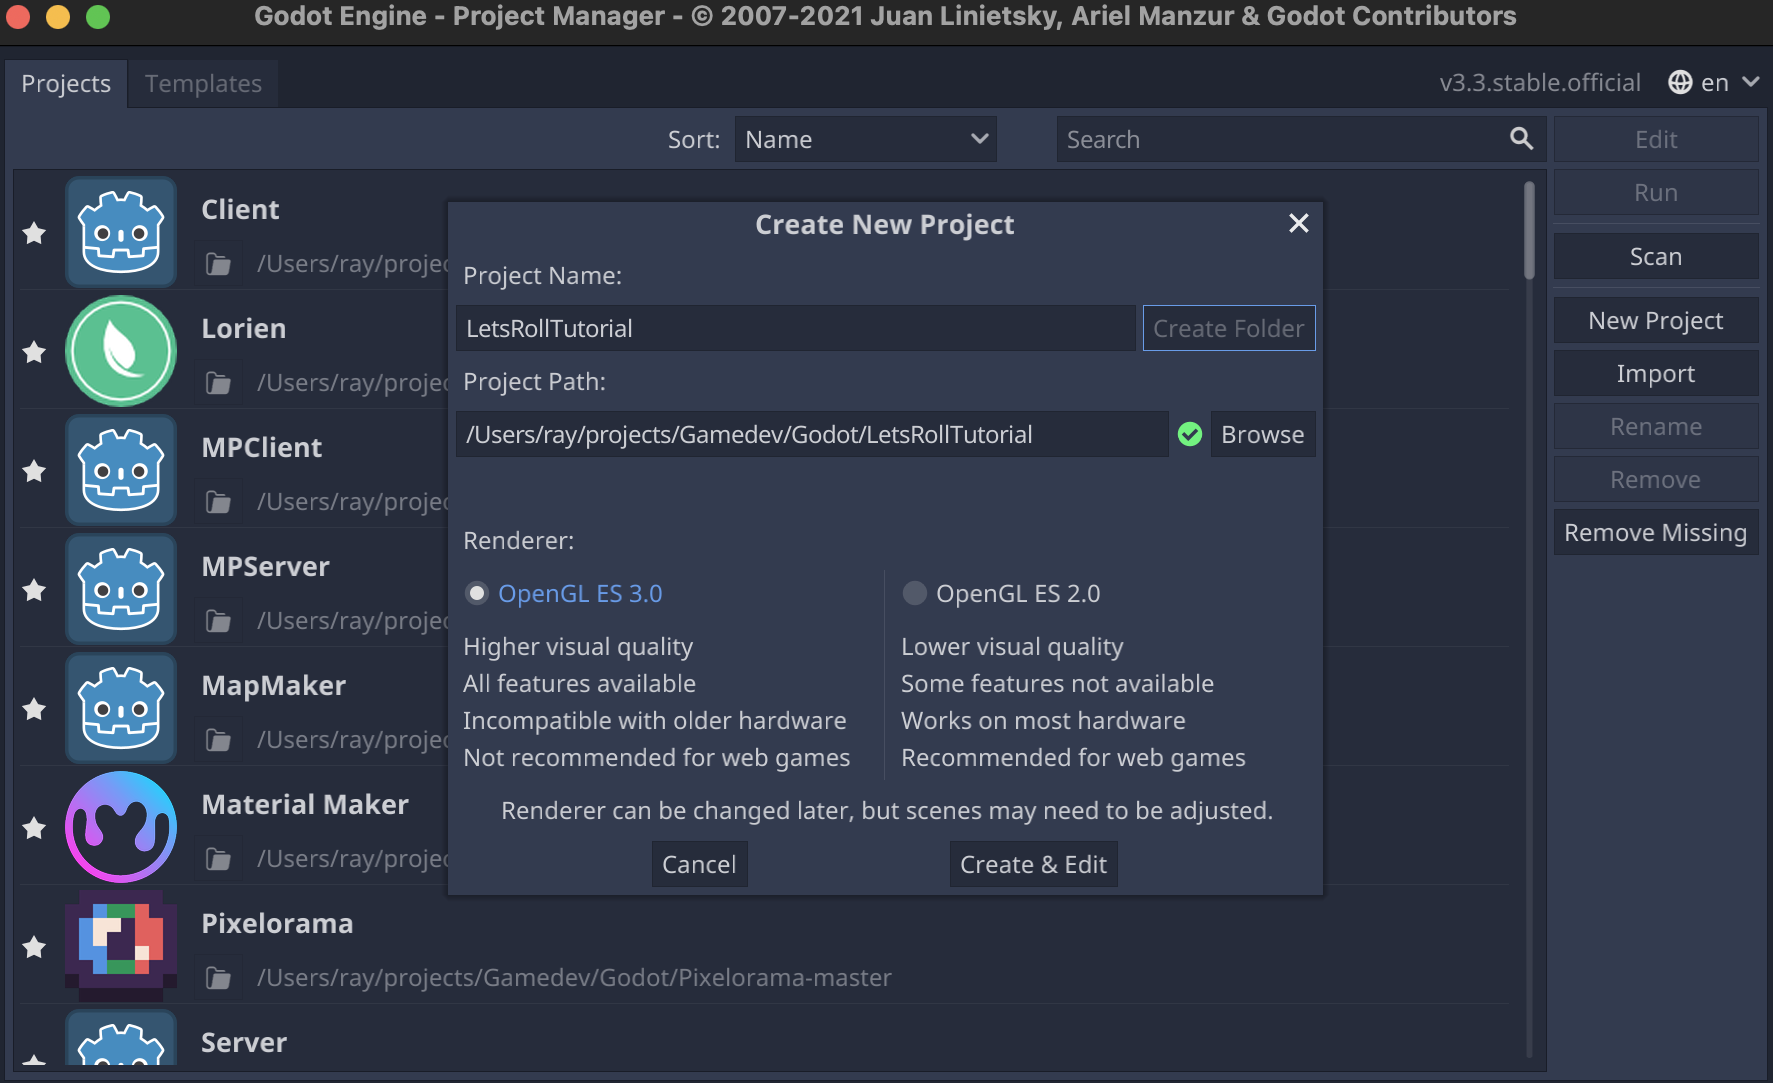
Create a new project:
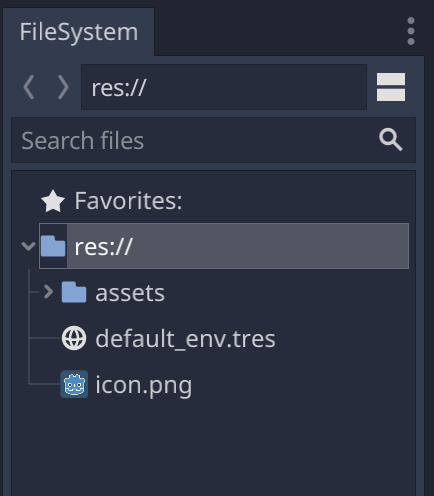
Unpack the zip file with the assets, and drag them into the project folder.
Creating the Level Geometry
Convert Block Models into Mesh Library
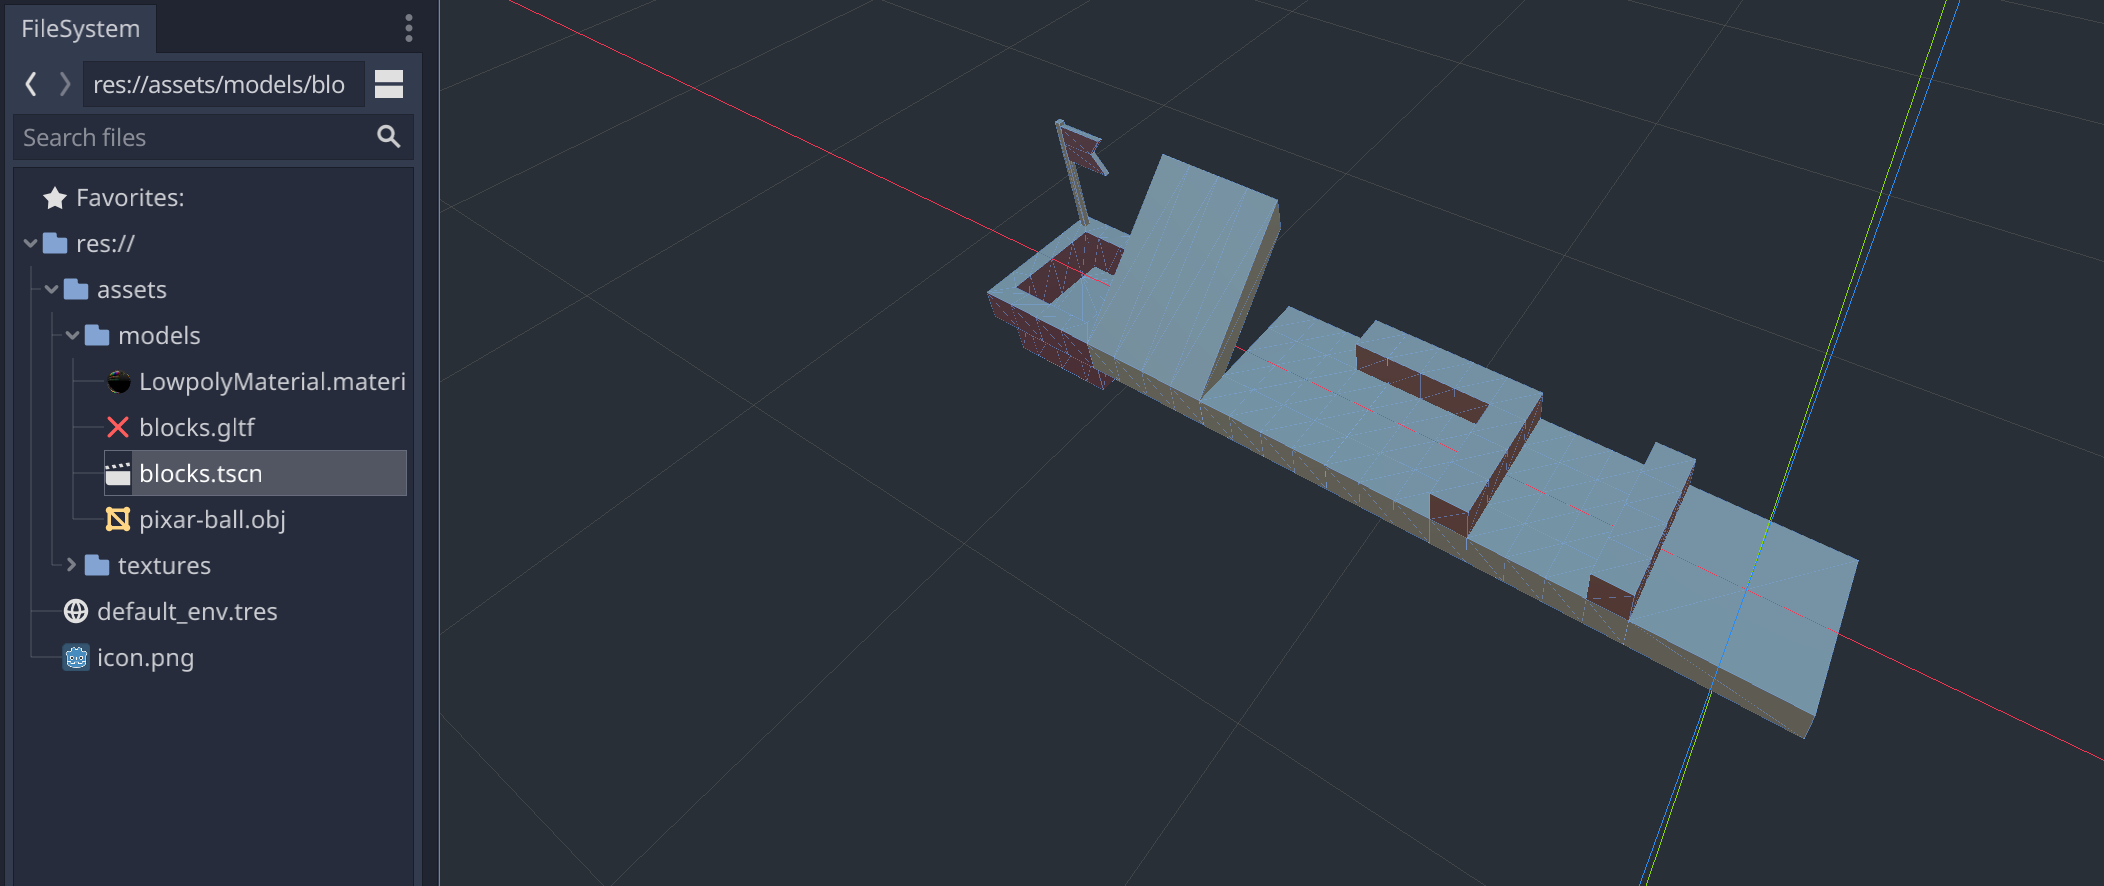
Open res://assets/models/blocks.gltf file. This file was exported from Blender, it contains the block models we will use to build our level. The .gltf file itself is not editable in Godot, so when you double click on the file, choose "New Inherited" - that will create a new Godot scene (in the .tscn format) which we can actually edit. Save the newly created scene as res://assets/models/blocks.tscn
Our goal is to be able to conveniently build game levels out of these blocks. To accomplish that will will use the GridMap node - it will help us to place these blocks into the level quickly and interactively.
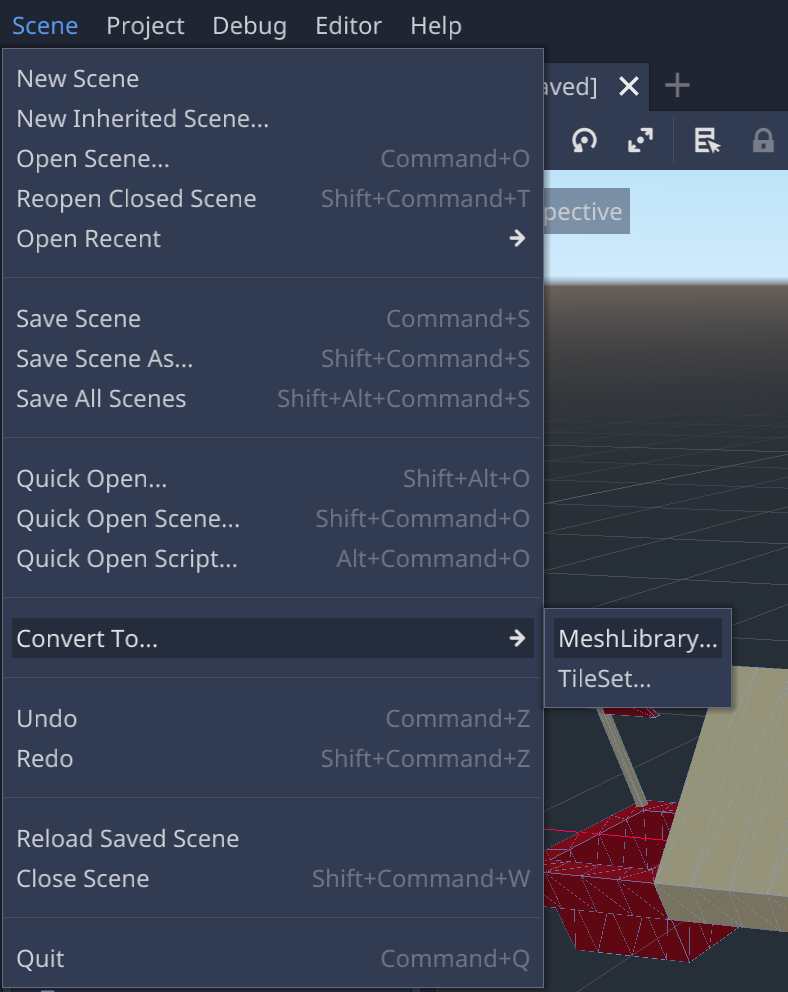
To be able to use the block models in GridMap, we need to convert them into "Mesh Library". That's very simple - click Scene > Convert To > MeshLibrary... and save it as res://assets/models/blocks.meshlib:
Building the Level
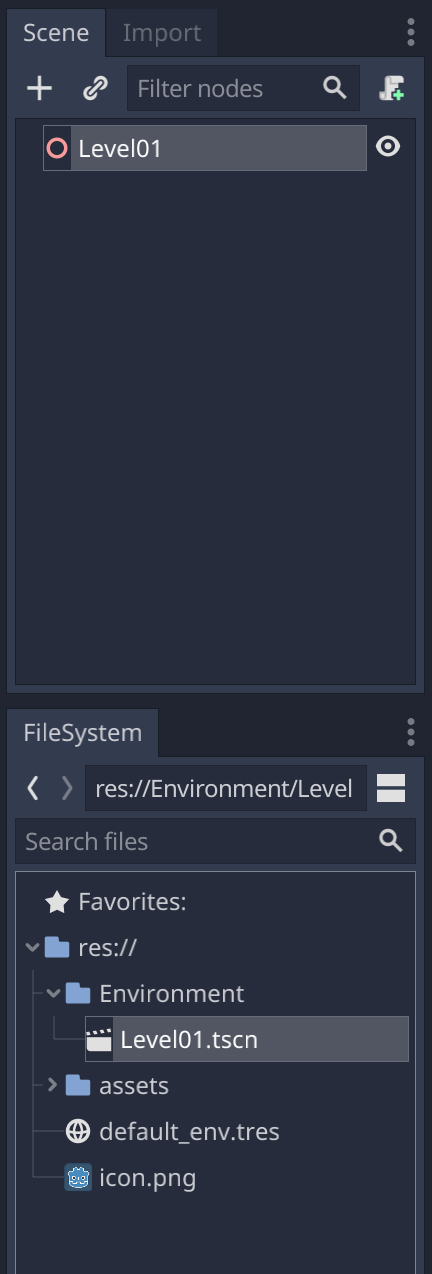
Our next step is to use these blocks to build the first level for our game. In the FileSystem panel create a new folder called "Environment", create a new 3D Scene, name it "Level01", and save it in the Environment folder:
Add a GridMap node, and drag the res://assets/models/blocks.meshlib file we've created in the previous section into the MeshLibrary property:
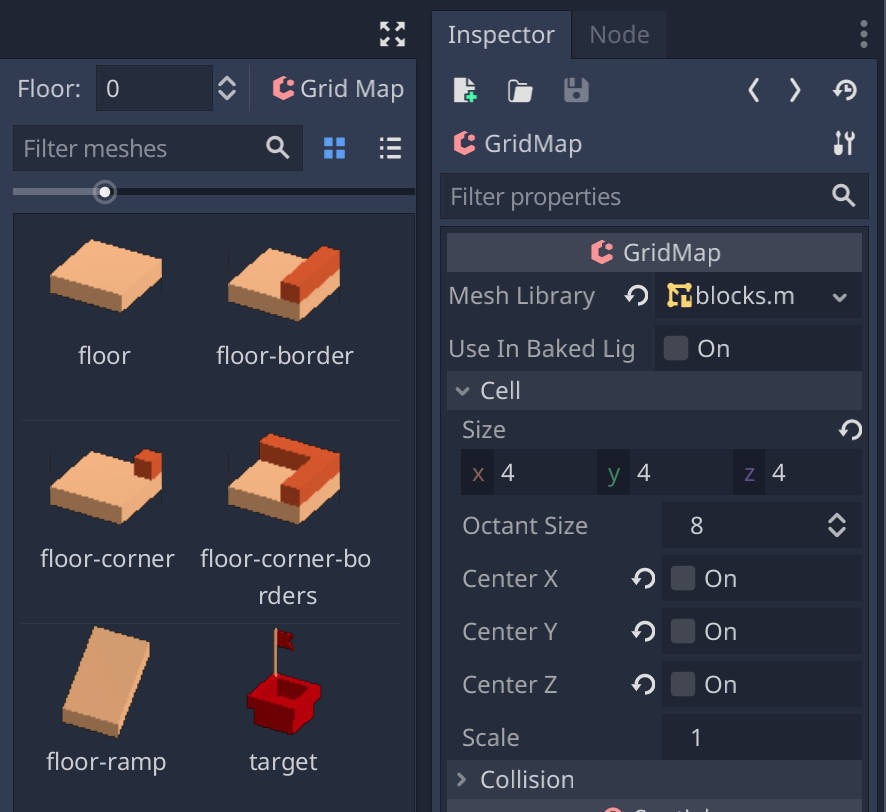
Make sure to change the Cell settings to the onces you see in the screenshot:
- Set the Cell Size to 4x4x4 (to make the size of the cell match the size of our block models)
- Un-check CenterX, CenterY, and CenterZ (we don't need our blocks to be automatically centered).
Now you can select the blocks from the list of meshes in the GridMap panel, and build a level out of them:

- Select the block from the panel and click LMB to place it into the level.
- Use
QandEto lower or raise the construction grid. - Use
A,S,D,Wbuttons to rotate the blocks however you want (You'll be mostly usingSbutton to rotate the blocks around the Y axis). - Right click removes the block.
Now we have made a level our ball can roll around in!
Create the Ball
Now it's time to make the ball that is going to roll around the level and jump as the player controls it.
Setting up the Ball scene
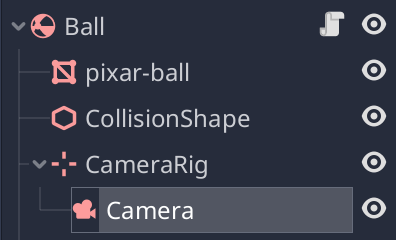
In this section, our goal will be to create the scene for the Ball that can be controlled by the player. It will look like this:
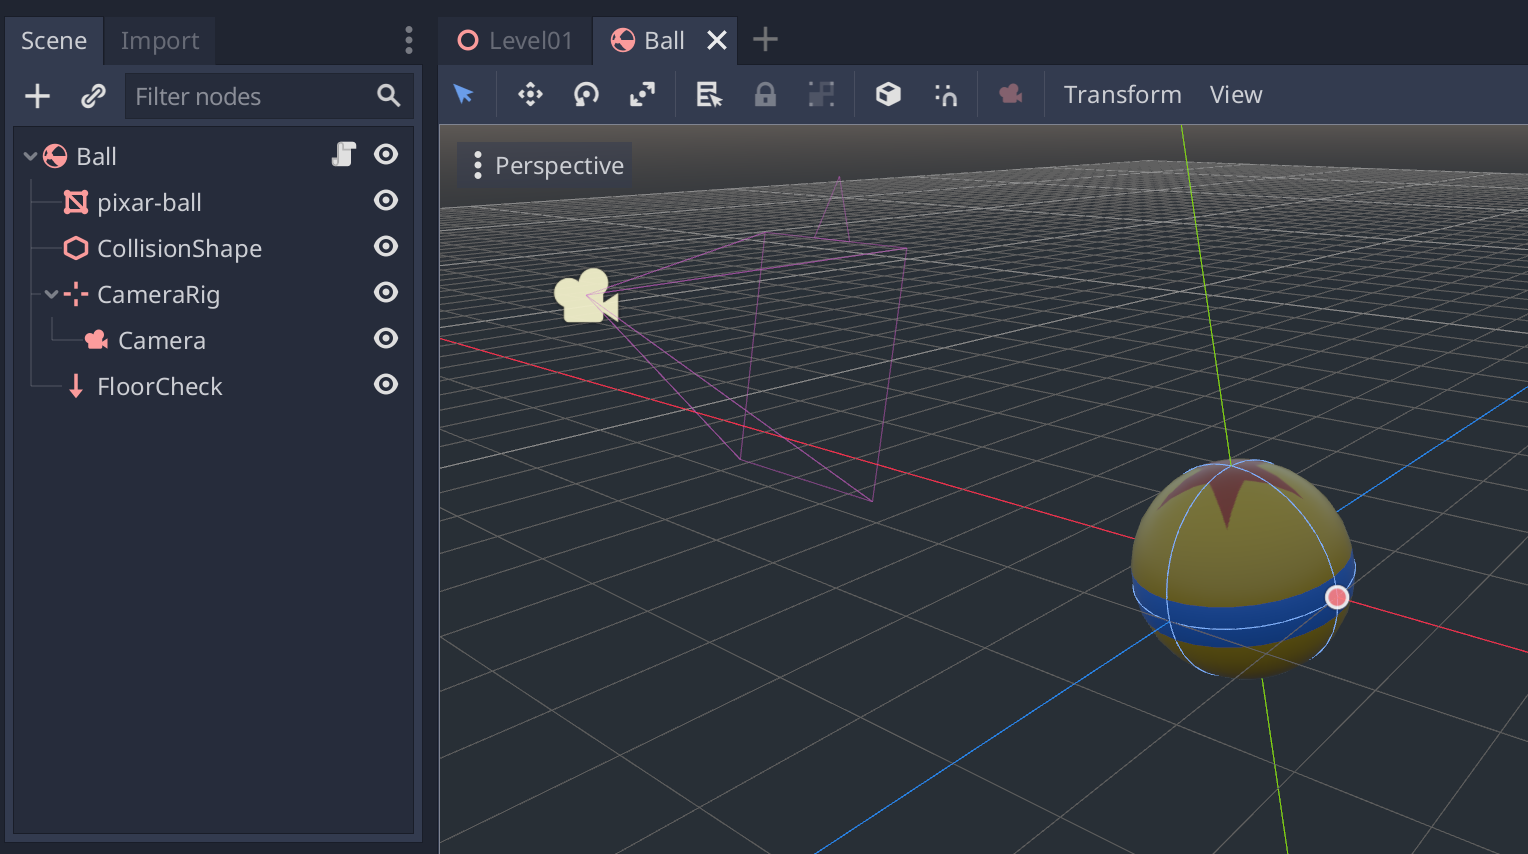
Ball is a RigidBody node (which means that Godot will automatically calculate and apply physics to it, making the ball bounce and roll). It has a spherical collision shape, and a Camera attached to it (that's the camera the player will look at the scene through). We also have a "FloorCheck" raycast which points towards the floor - we will use it to determine whether the ball is currently on the floor and allowed to jump.
Create a new scene with RigidBody node as its root:
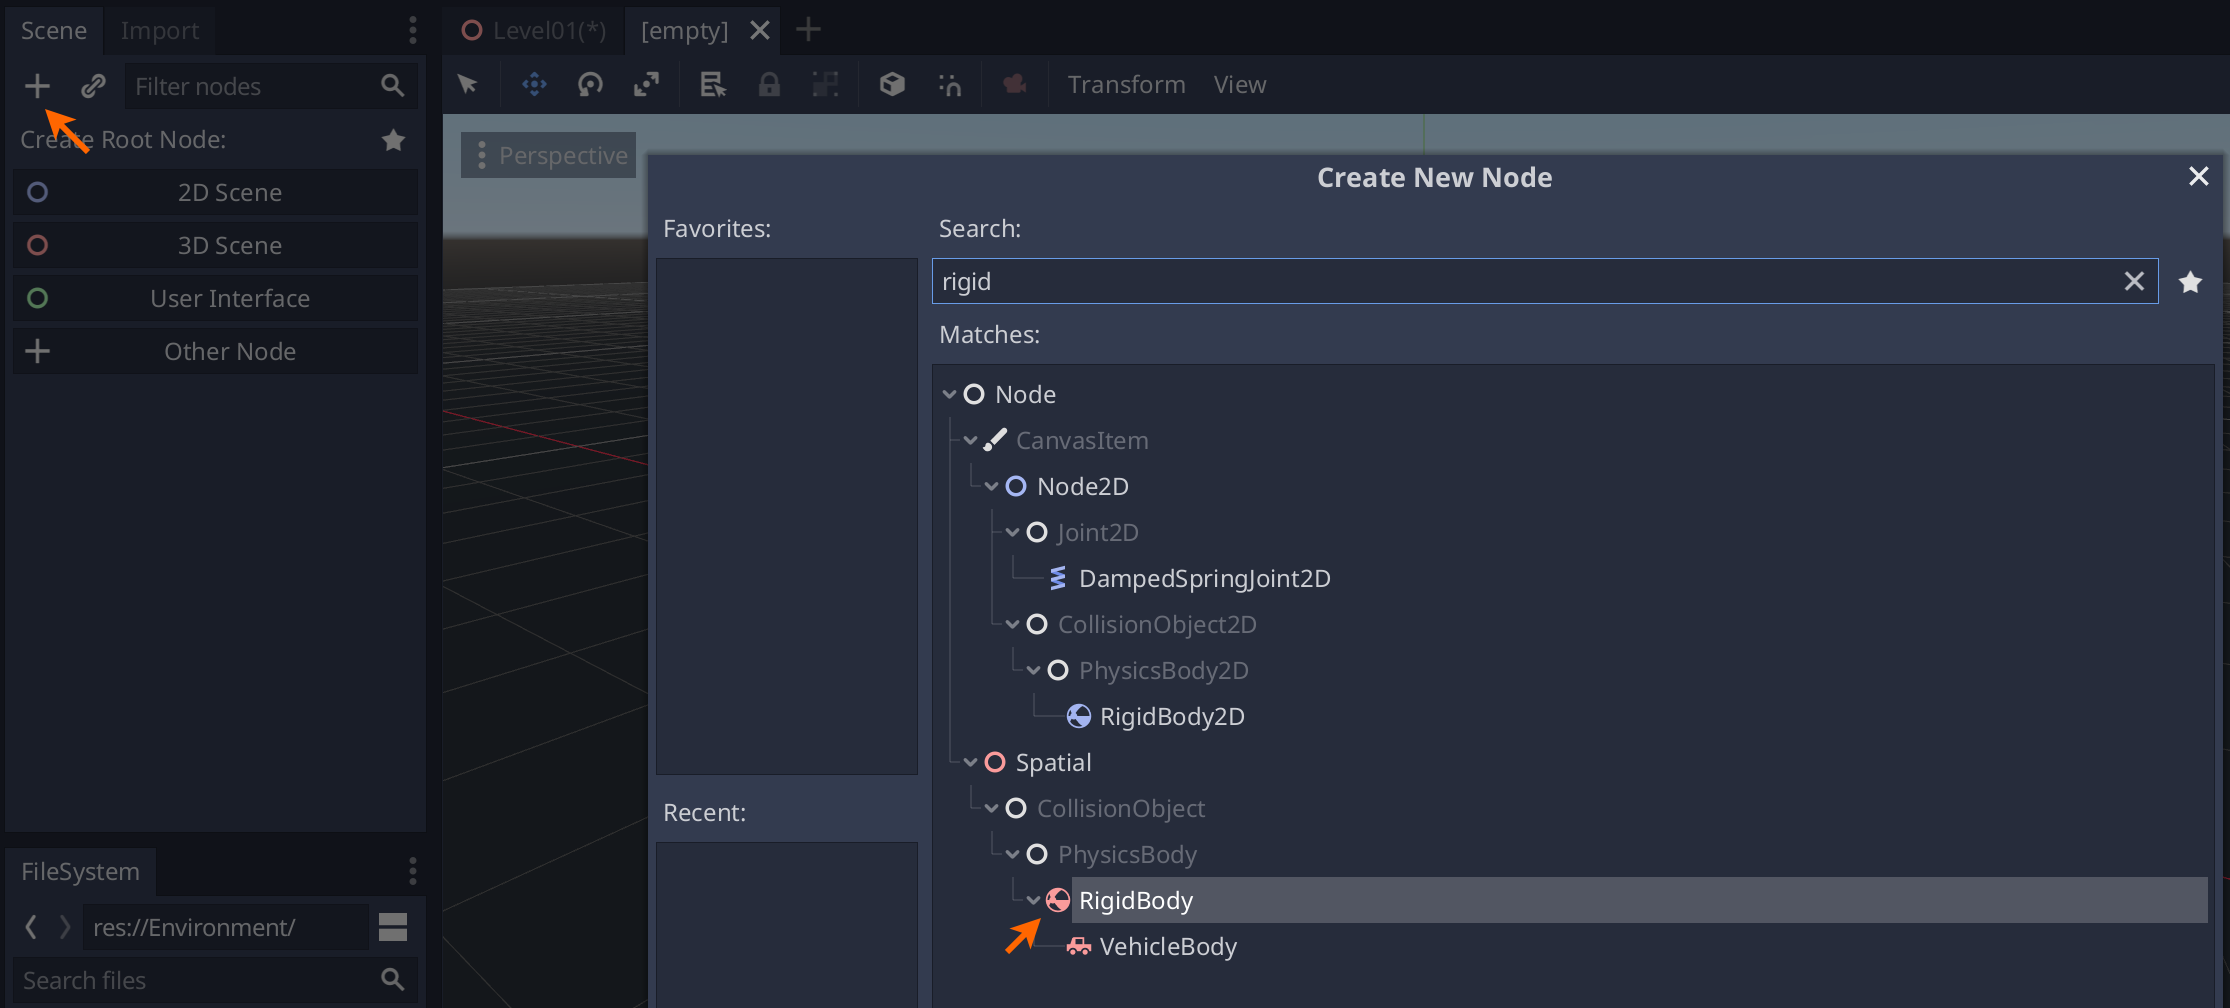
Rename the node as "Ball", and save it to res://Player/Ball.tscn
From the assets folder drag the pixar-ball.obj model onto the scene and reset its Transform to zero, to place it into the center of the scene.
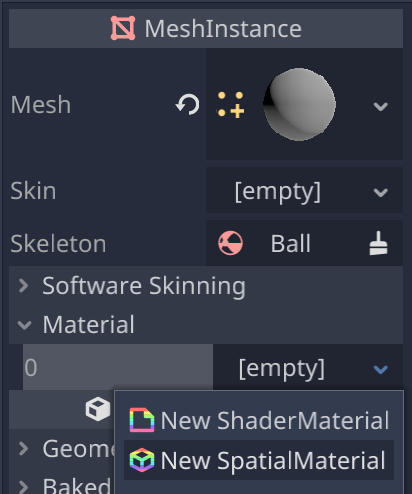
Assign a new material to the pixar-ball node:
From the res://assets/textures folder drag the pixar-ball.png texture into the material's albedo texture slot:
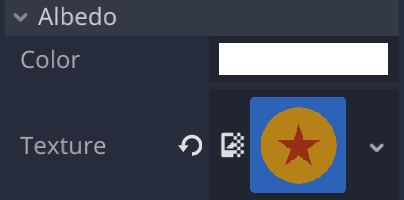
Set the material's roughness to 0.4, which will add a nice highlight to the ball making it shinier.
Add a new CollisionShape node under the Ball node, and under Shape property create New Sphere Shape:
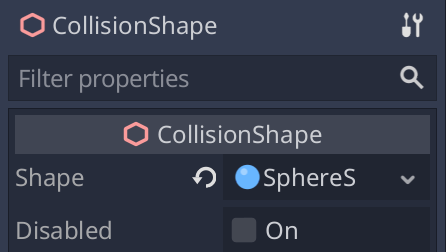
CollisionShape represents a simplified shape of the Ball model, Godot uses it when it simulates the physics to allow our ball to actually interact with other physics objects (bounce off the floor for example).
Adding Camera Rig
Now we want to have a camera attached to the Ball, so that as the ball moves, the camera moves along with it.
Create a new Position3D node under the "Ball", and name it "CameraRig". Underneath the "CameraRig" add a Camera node:
Set Camera's Translation to (0, 2.85, 3.5) and Rotation X to -30, so that camera is looking at the ball from behind and above:
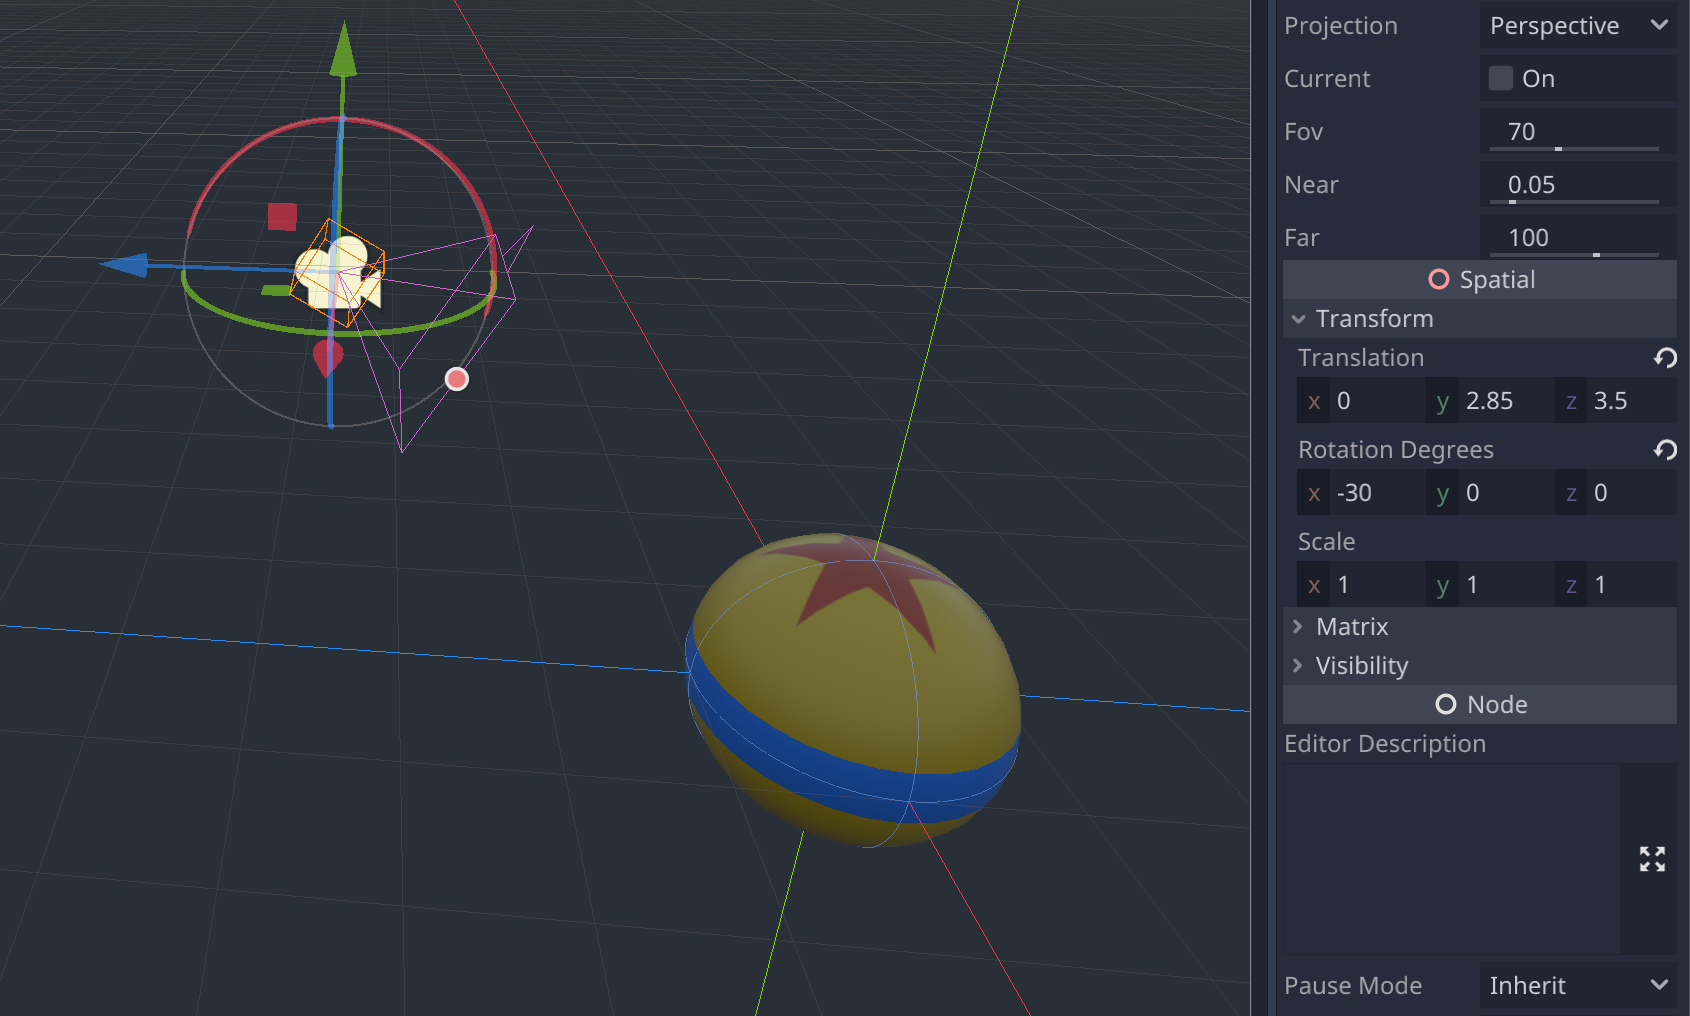
We need the "CameraRig" node because later on we will write the code that continuously positions "CameraRig" right in the middle of the Ball, so that as the ball moves, camera moves with it. The "Camera" node is positioned relative to the "CameraRig", so that its always looking at the ball from the same distance and angle.
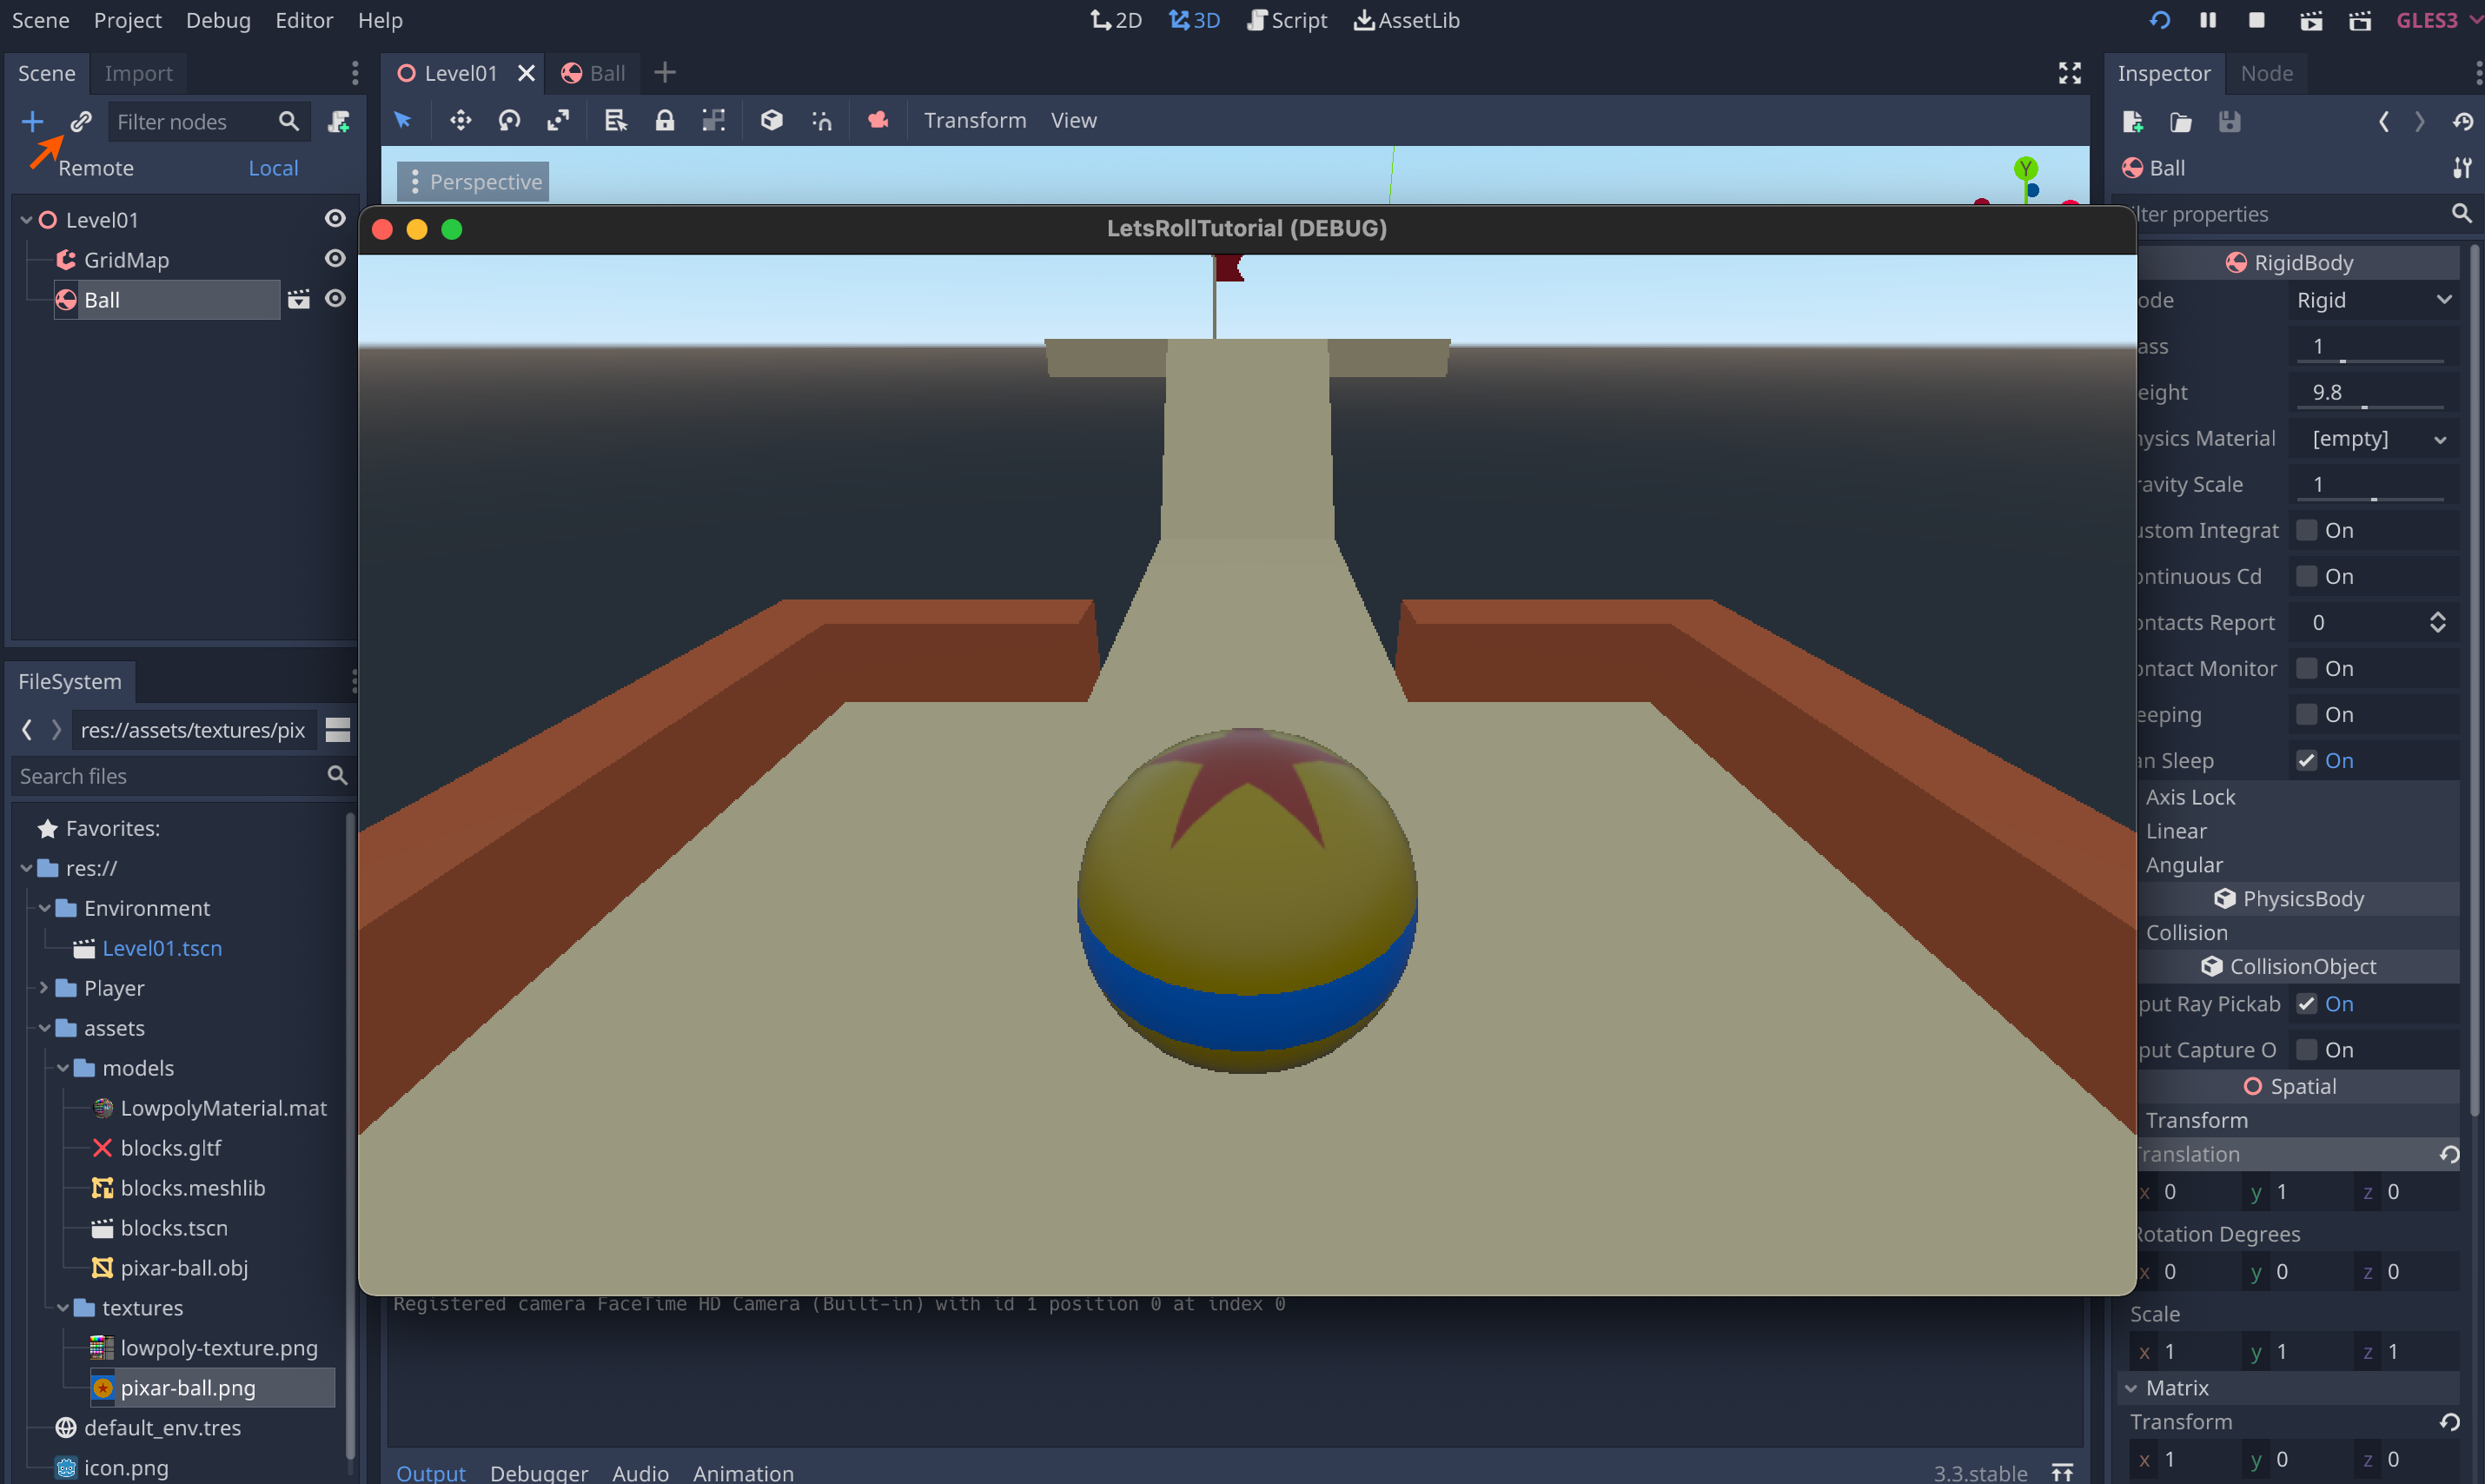
Don't forget to save the scene, then add it to the Level01 scene (by clicking on the link icon in the Scene panel). Lift the Ball 1 unit up on the Y axis, so that it's resting on the floor. Now if you run the game, you will see the Ball in the middle of our level:
Movement code
Now we're finally ready to do the exciting part - let's make the ball move!
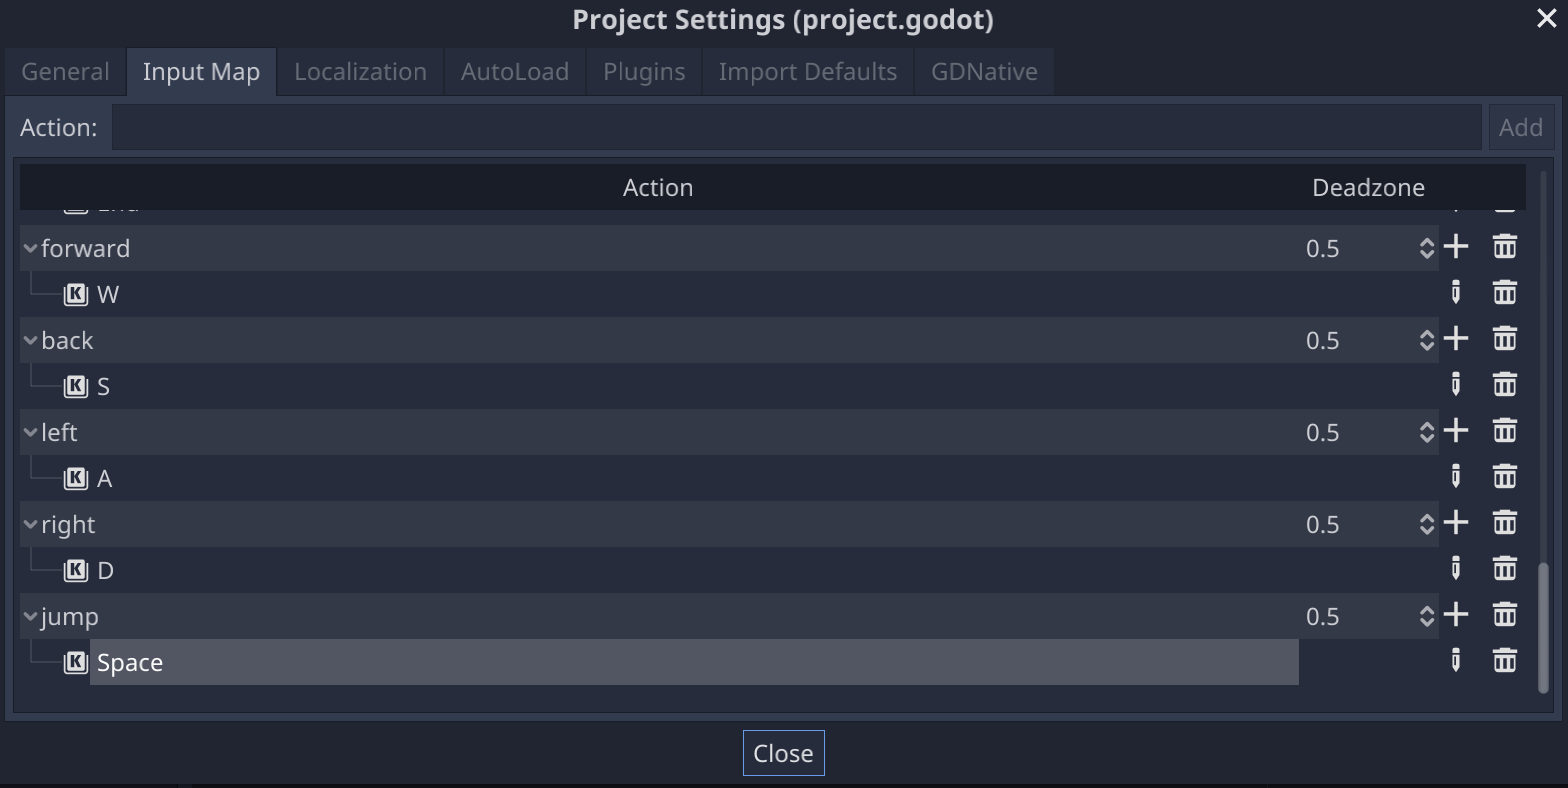
First, let's set up the keys the player can press to move the ball. Go to Project > Project Settings > Input Map, and add the following keys:
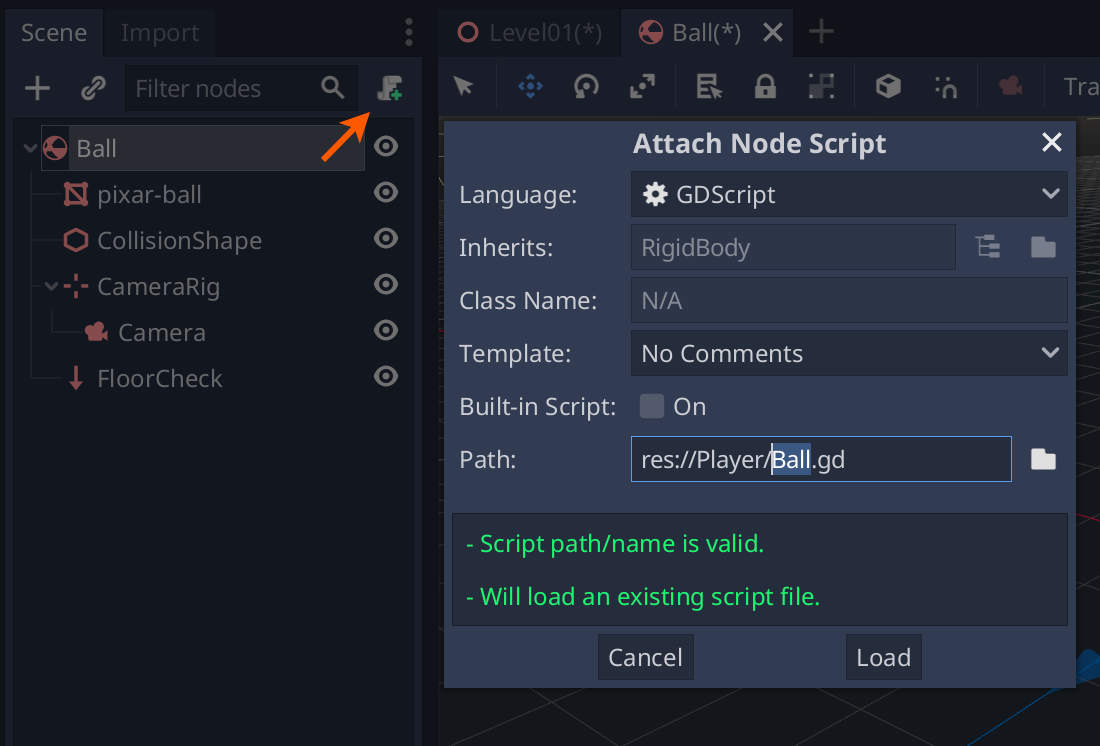
Attach a new script to the the Ball (res://Player/Ball.gd):
Add the following code:
extends RigidBody

var rolling_force = 40

func _ready():
  # Camera is parented to the Ball, but we don't want it to rotate
  # along with the Ball. This line of code tells Godot to ignore the Ball's
  # transformations, it will be as if the CameraRig is parented to Level01
  $CameraRig.set_as_toplevel(true)

func _physics_process(delta):
  # Move the ball in response to player pressing the buttons.
  # When the button is pressed, we increase the angular velocity
  # of the RigidBody in the corresponding dierction, making the ball spin.
  # The rest is handled by the physics engine, when the ball spins - it rolls.
  if Input.is_action_pressed("forward"):
    angular_velocity.x -= rolling_force*delta
  elif Input.is_action_pressed("back"):
    angular_velocity.x += rolling_force*delta
  if Input.is_action_pressed("left"):
    angular_velocity.z += rolling_force*delta
  elif Input.is_action_pressed("right"):
    angular_velocity.z -= rolling_force*delta
Now if you run the game, the ball is going to move in response to you pressing the buttons, but currently the camera stays in place (because we set it as top level, telling Godot to treat it as if it wasn't parented to the Ball). To move the camera along with the ball, add the following lines of code:
extends RigidBody

var rolling_force = 40

func _ready():
    $CameraRig.set_as_toplevel(true)

func _physics_process(delta):
    # Move the camera along with the ball
    $CameraRig.global_transform.origin = lerp(
        $CameraRig.global_transform.origin,
        global_transform.origin, 0.1
    )

    if Input.is_action_pressed("forward"):
        angular_velocity.x -= rolling_force*delta
    elif Input.is_action_pressed("back"):
        angular_velocity.x += rolling_force*delta
    if Input.is_action_pressed("left"):
        angular_velocity.z += rolling_force*delta
    elif Input.is_action_pressed("right"):
        angular_velocity.z -= rolling_force*delta
We're setting CameraRig's global position to be equal to Ball's global translation (global_transform.origin). lerp stands for linear interpolation, it will make it so that the camera position follows the ball smoothly instead of instantaneously, so if the ball suddenly jumps up, it will take the camera a few frames to catch up with it.
Jump Functionality
Now let's add the jumping functionality. In the Ball scene, add a RayCast node, rename it to "FloorCheck", and set its properties like so:
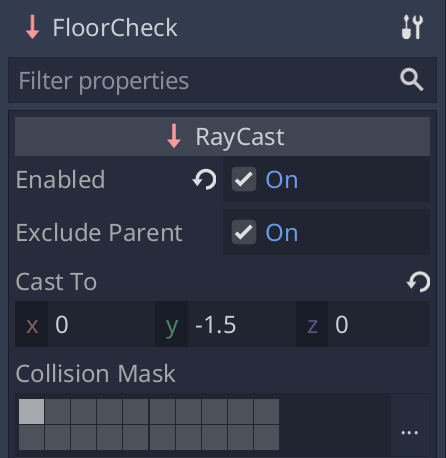
Imagine the raycast as a small arrow pointing downwards from the center of the Ball, it is just a bit longer than the ball's radius. We can check whether this arrow intersects with the floor, if it does - we know that the Ball is on the ground, and we are able to jump. If it doesn't, we know that the Ball is currently in the air, and we don't want the player to be able to jump when its already in the air.
Here's how the final Ball movement code looks like:
extends RigidBody

var rolling_force = 40

func _ready():
    $CameraRig.set_as_toplevel(true)
    # Make sure FloorCheck raycast doesn't inherit Balls transforms,
    # so that it doesn't rotate as the ball rolls
    $FloorCheck.set_as_toplevel(true)

func _physics_process(delta):
    $CameraRig.global_transform.origin = lerp(
        $CameraRig.global_transform.origin,
        global_transform.origin, 0.1
    )
    # As the ball moves, move the raycast along with it
    $FloorCheck.global_transform.origin = global_transform.origin

    if Input.is_action_pressed("forward"):
        angular_velocity.x -= rolling_force*delta
    elif Input.is_action_pressed("back"):
        angular_velocity.x += rolling_force*delta
    if Input.is_action_pressed("left"):
        angular_velocity.z += rolling_force*delta
    elif Input.is_action_pressed("right"):
        angular_velocity.z -= rolling_force*delta

    # When the ball is on the floor and the user presses jump button,
    # add impulse moving the ball up.
    if Input.is_action_just_pressed("jump") and $FloorCheck.is_colliding():
        apply_impulse(Vector3(), Vector3.UP*1000)
Raycast is parented under the ball, and as the ball is rolling, raycast arrow would rotate along with it. We don't want that, we want it to be constantly pointing downwards, so we use the same trick we used with the camera - we use set_as_toplevel to tell Godot to ignore the fact that raycast is parented to the ball, and then in the _physics_process() we set raycast's position to always be equal to the ball's global translation, so that it moves along with the ball (but doesn't rotate with it).
$FloorCheck.is_colliding() tells us whether the raycast intersects with he floor. If the ball is on the floor and the player has just pressed the jump button, we propel the Ball upwards using apply_impulse().
Tweaking Ball Physics settings
If you try playing the game now, you'll notice that the ball feels too light and too slippery. We want to modify its physics properties so that the gameplay feels more fun and controllable. Click on the Ball node, assign it a new Physics Material, and modify the settings as follows:
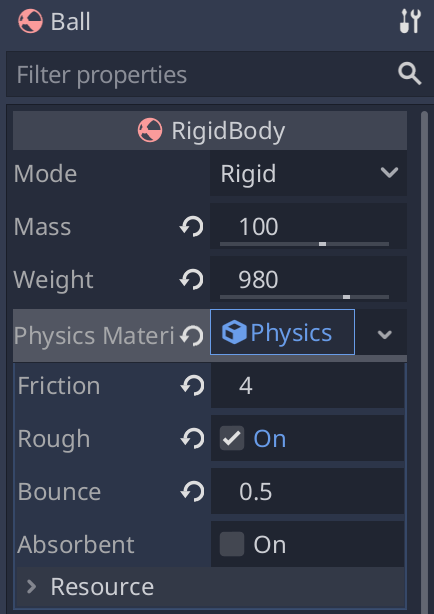
We make it heavier and increase the friction with the floor to make the Ball easier to control. We add some bounciness to make the ball bounce off the floor and walls, making it more fun and challenging to play.
Also set Angular > Damp to 1, so that ball gradually comes to a halt when we don't press any buttons.
Finally, you want to go to Project > Project Settings > Physics > 3D and switch Physics Engine to "GodotPhysics". There are two different physics engines in Godot, and I chose this one because the other one doesn't work when you export the game to be playable in the browser.
Lighting and Render Settings
Now it's time to make our game look pretty. First go to Project > Project Settings and set the following settings:
Window > Width and Height: 1024x576
(sets the default game resolution).Window > Stretch > Mode: 2D,Aspect: keep.
(makes it possible to resize the game window, and scale the picture according to its size).Rendering > Quality > Msaa: 4x.
(enables anti-aliasing, which removes the jagged lines at the edges of the objects).Rendering > Quality > Directional Shadow > Size: 8192
(improves the shadow quality).
Add a new WorldEnvironment node to the Level01, create a new environment and set the settings as follows:
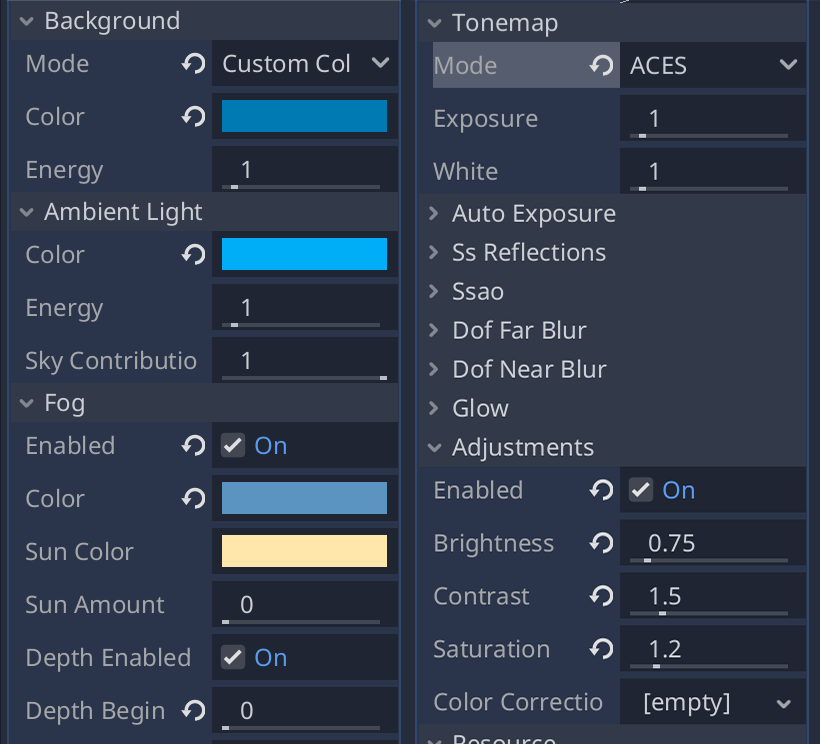
WorldEnvironment allows us to change the ambient lighting (which we set to the color of the sky), and add post-processing effects like fog and color correction.
- Custom Color -
#2b79ad - Ambient light -
#1eacf1 - Fog enabled, color -
#6792bd - Tonemap - ACES
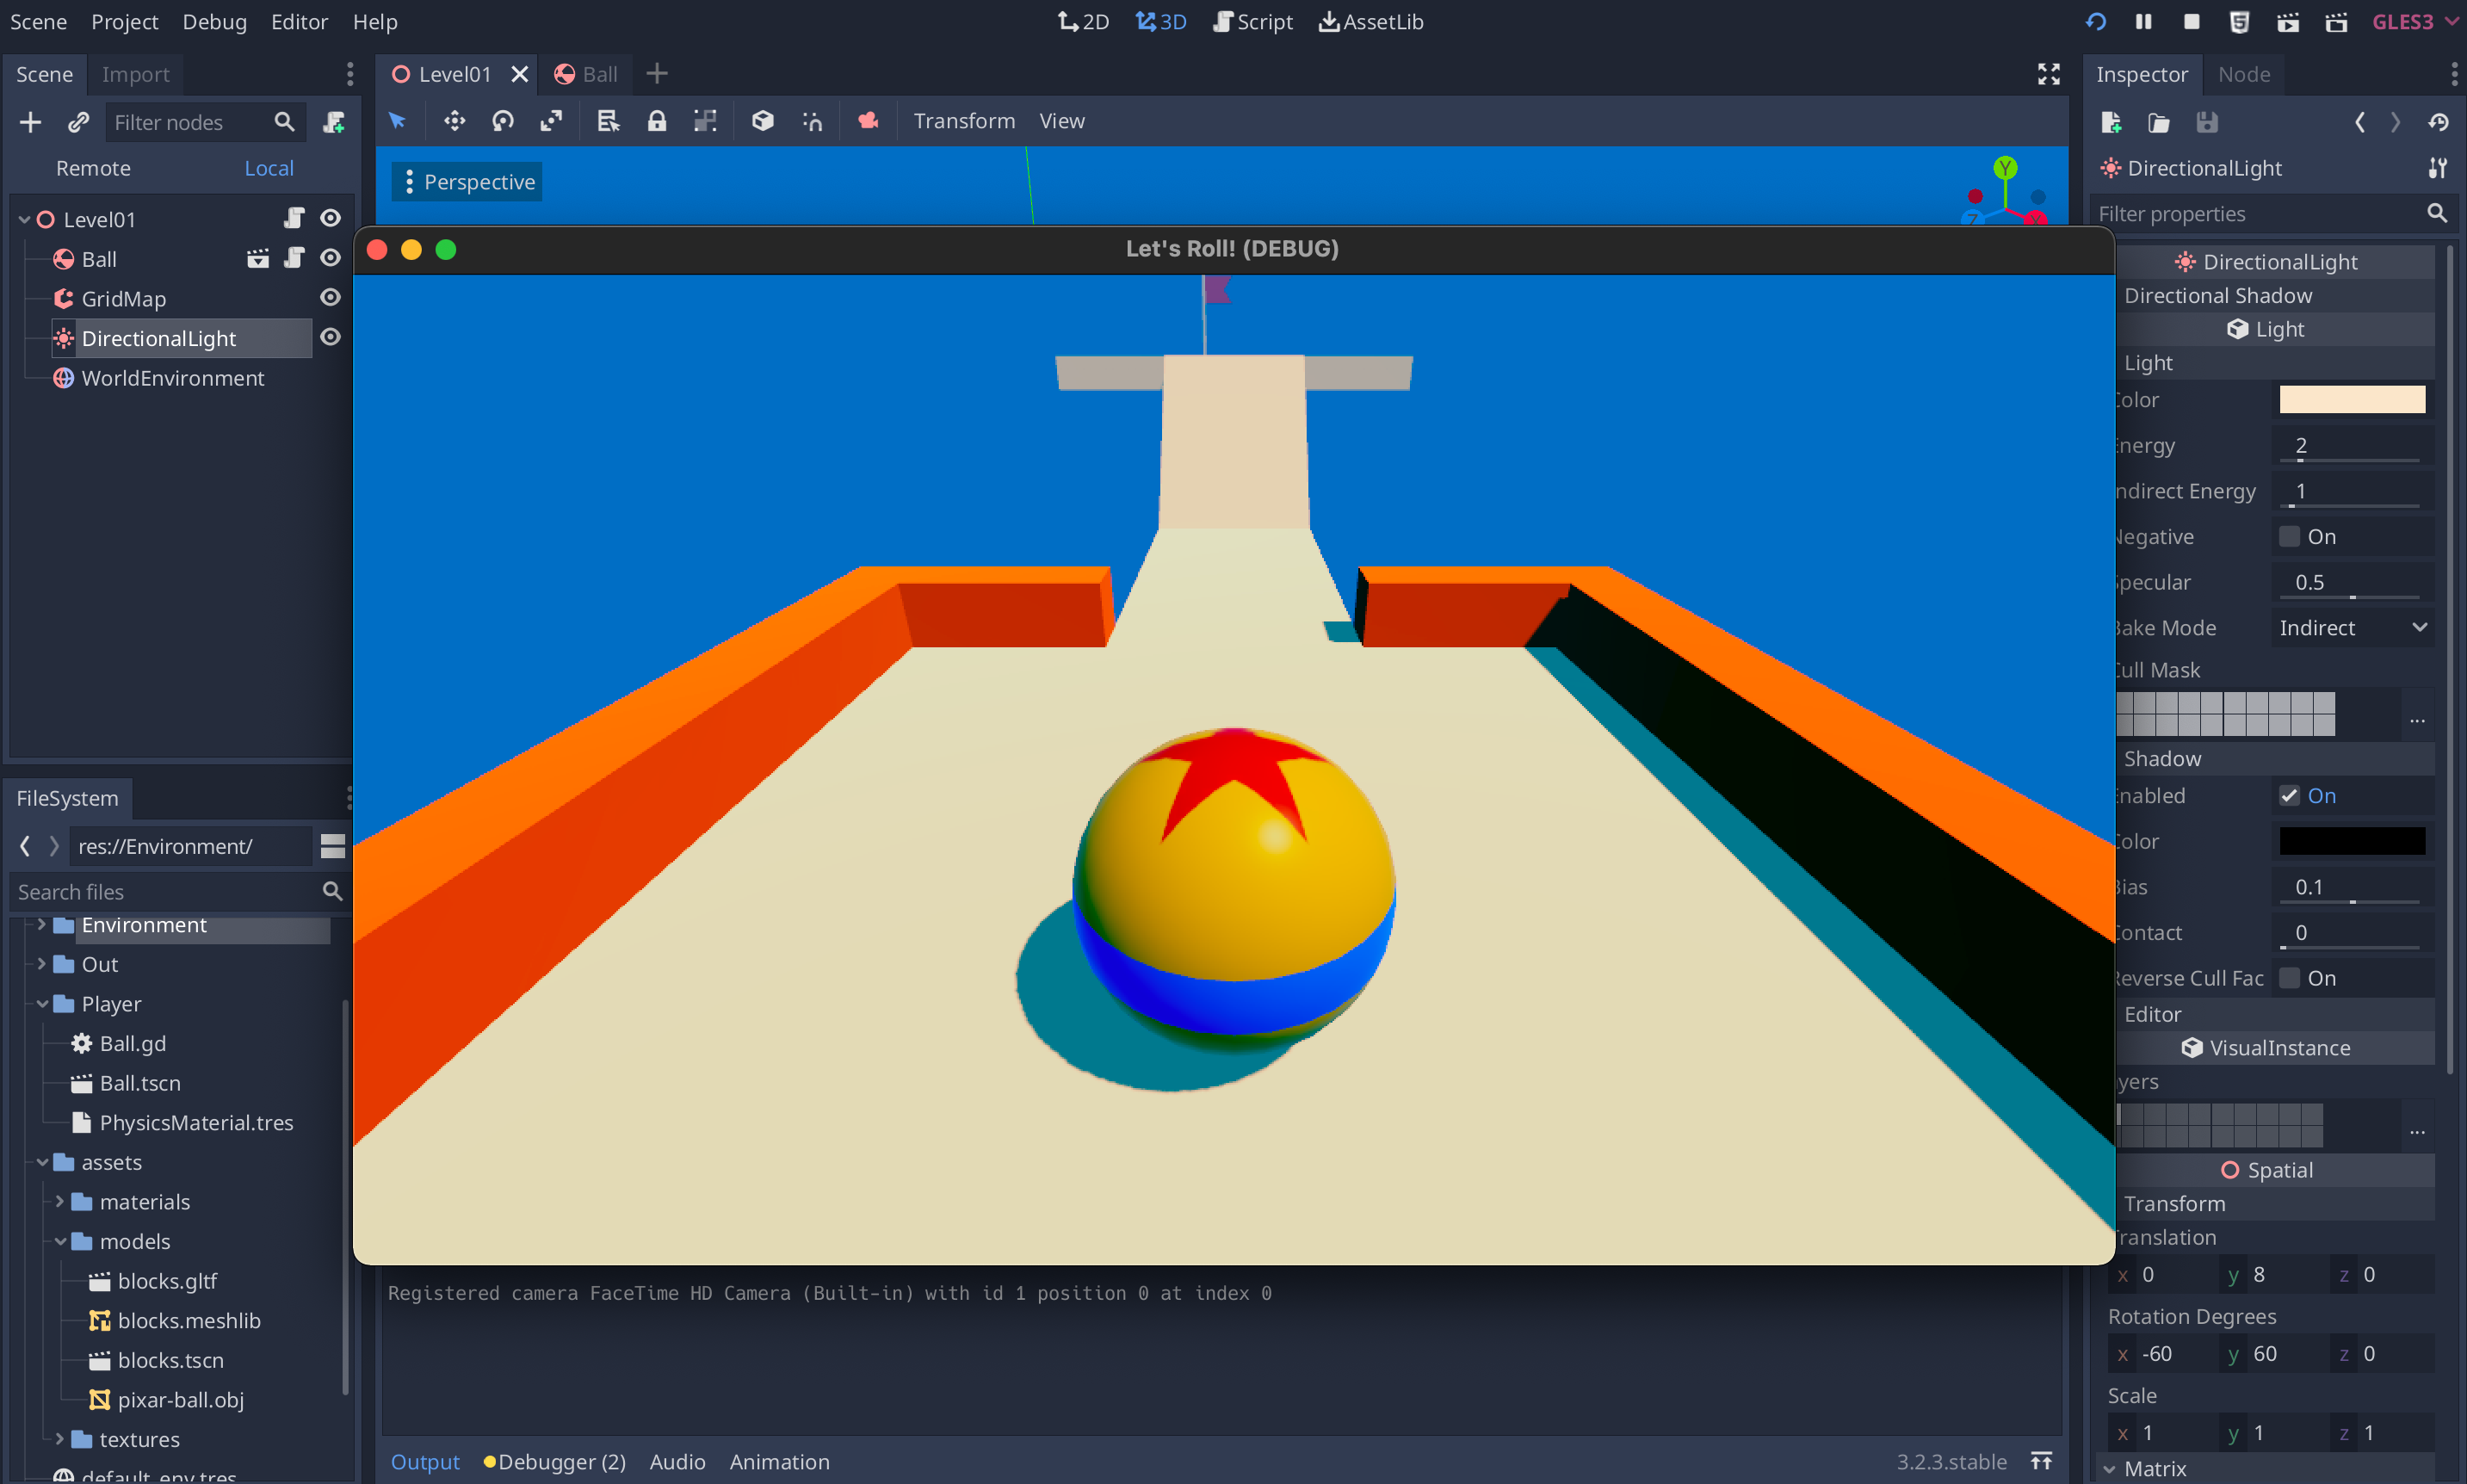
Add a DirectionalLight, it will represent the main light in the scene (the sun). Set:
- Color -
#f8e6cd - Energy - 2
- Shadow - Enabled.
- Rotation -
-60, 60, 0
The final look of the game:
DeathZone
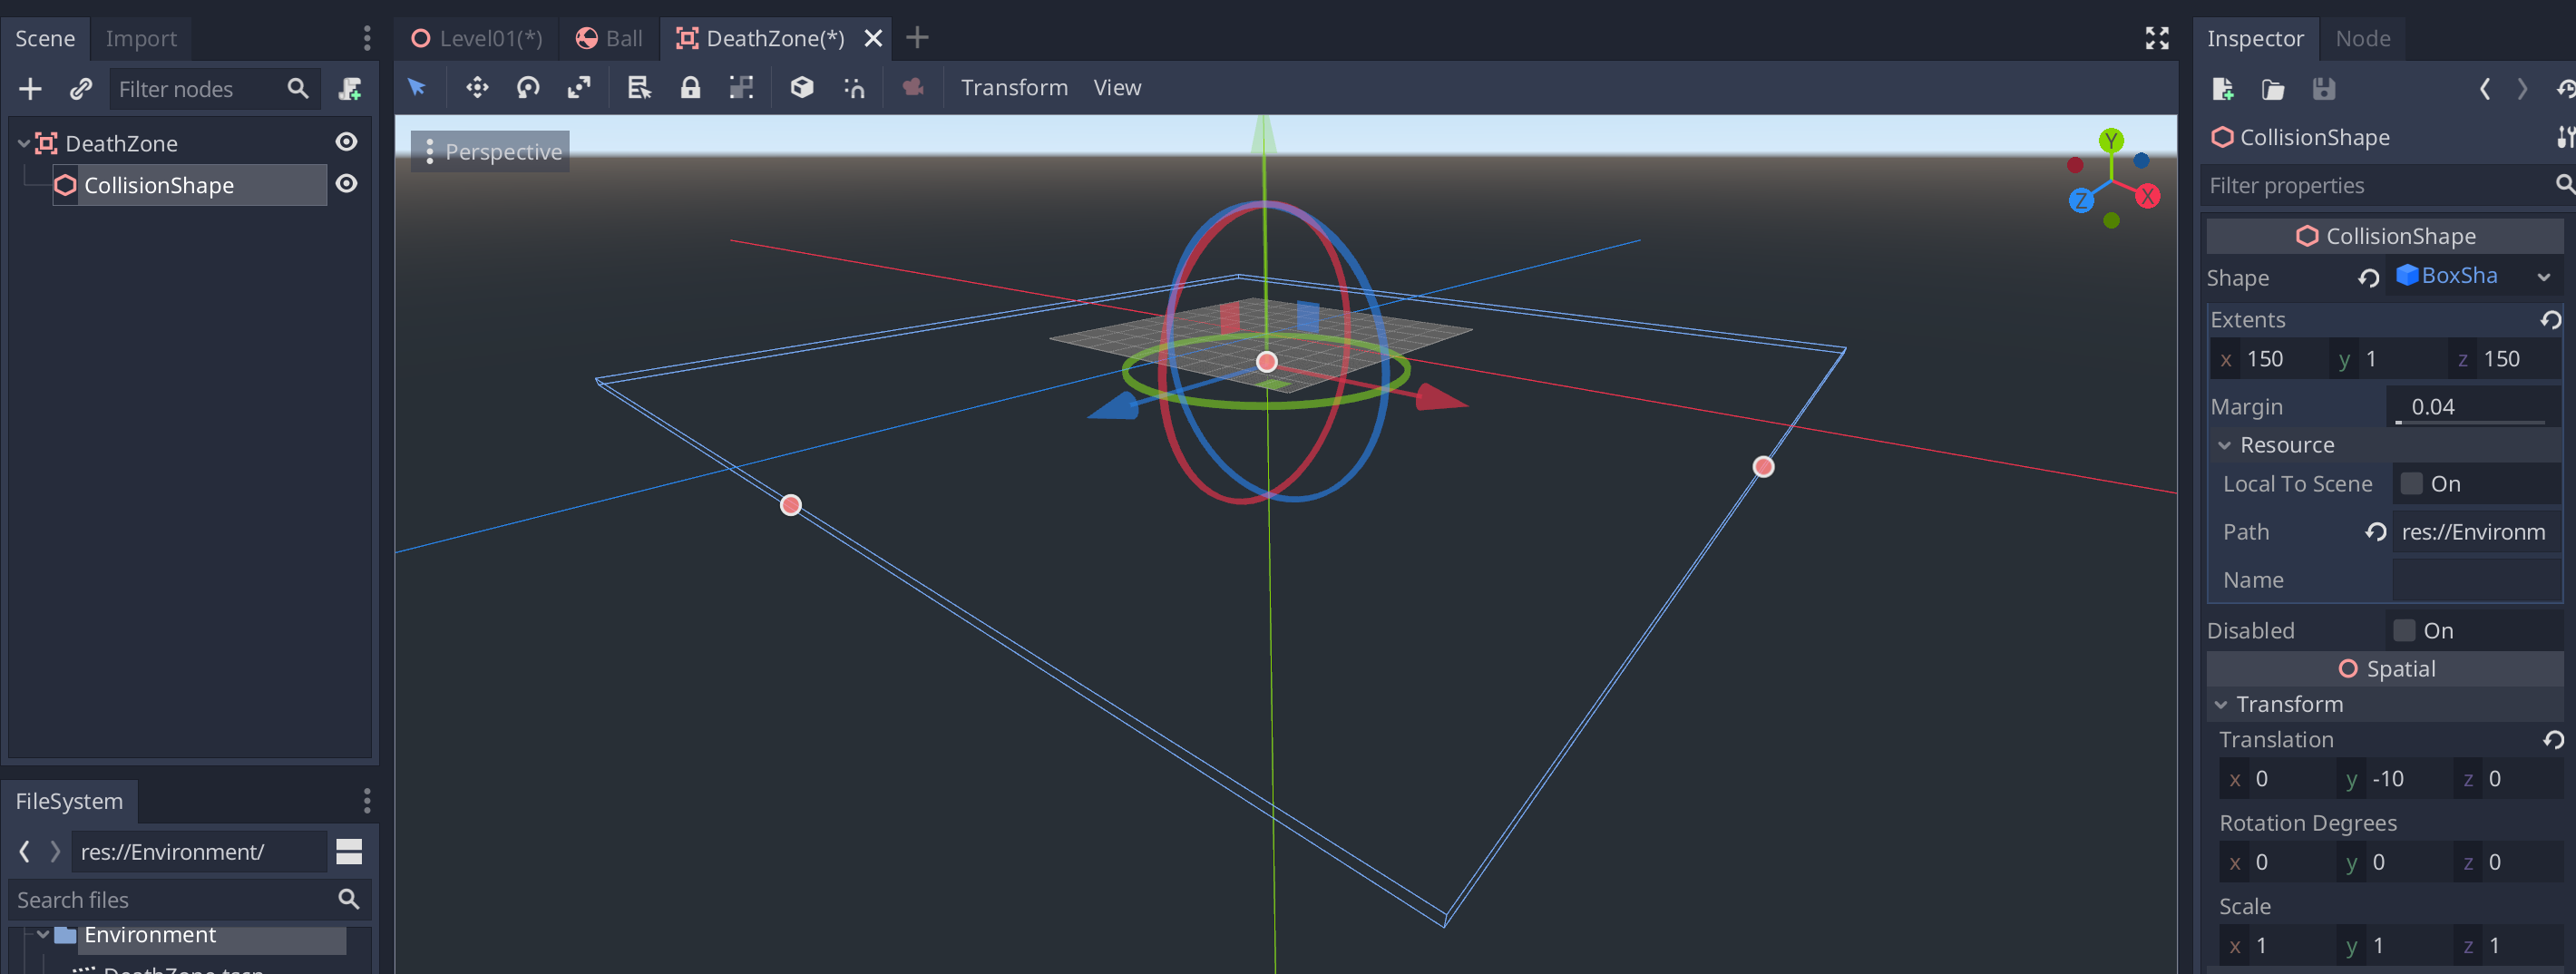
Next, we want to restart the game when the ball rolls off the level. Create a new Area node, name it "DeathZone" and save it into res://Environment/DeathZone.tscn. Add a collision shape to it, create the BoxShape, make it pretty large (set its extents to 150, 1, 150), and set it's translation y to -10 to move it below the ground:
Link this scene into the level (Level01). When the ball falls off the level, it will cross the DeathZone, and we'll know that we need to restart the game.
First, let's attach a new script to the Level01 node, and call this script "Level.gd":
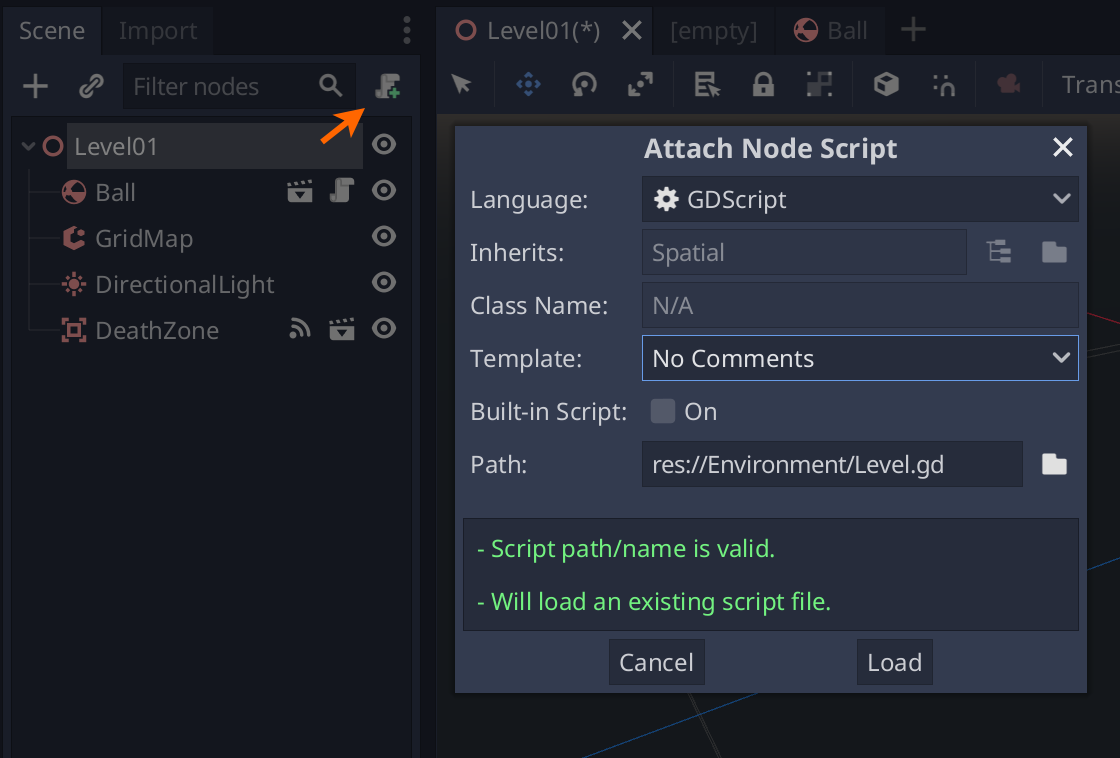
Note that we're naming this script "Level.gd" not "Level01.gd" - when we have more levels, this script will be attached to them as well.
Now, select the DeathZone node, open the Node panel, and connect the body_entered signal of DeathZone to the Level script:
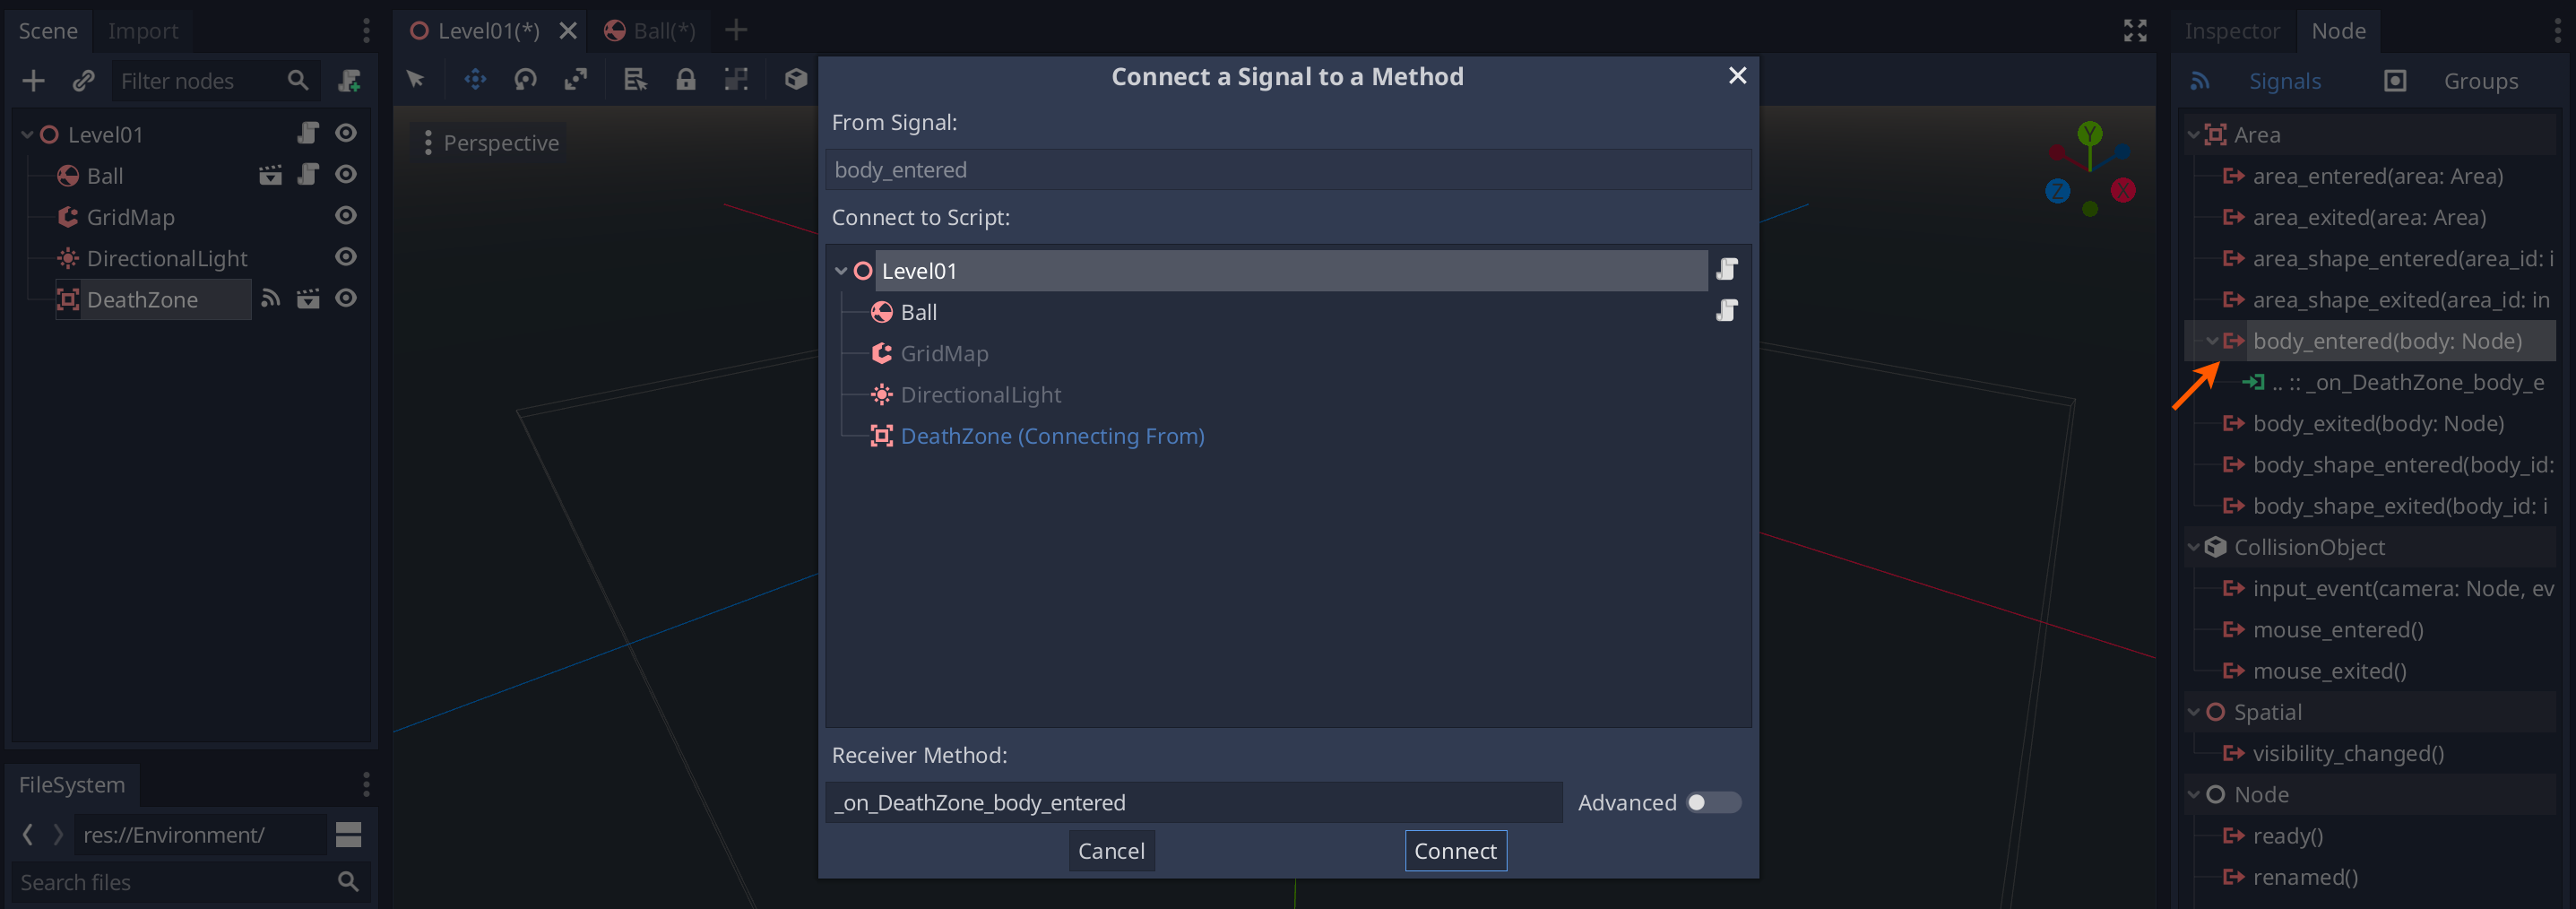
Godot will automatically create _on_DeathZone_body_entered() function for you, this function will trigger every time our Ball falls down and enters the DeathZone. Now we just need to tell Godot to reload the level as soon as that happens:
func _on_DeathZone_body_entered(body):
    if body.name == "Ball":
        get_tree().reload_current_scene()
VictoryZone and Levels.
Finally, one last thing we want to do is to add levels. As soon as the ball reaches its target, we want to move the player to the next level.
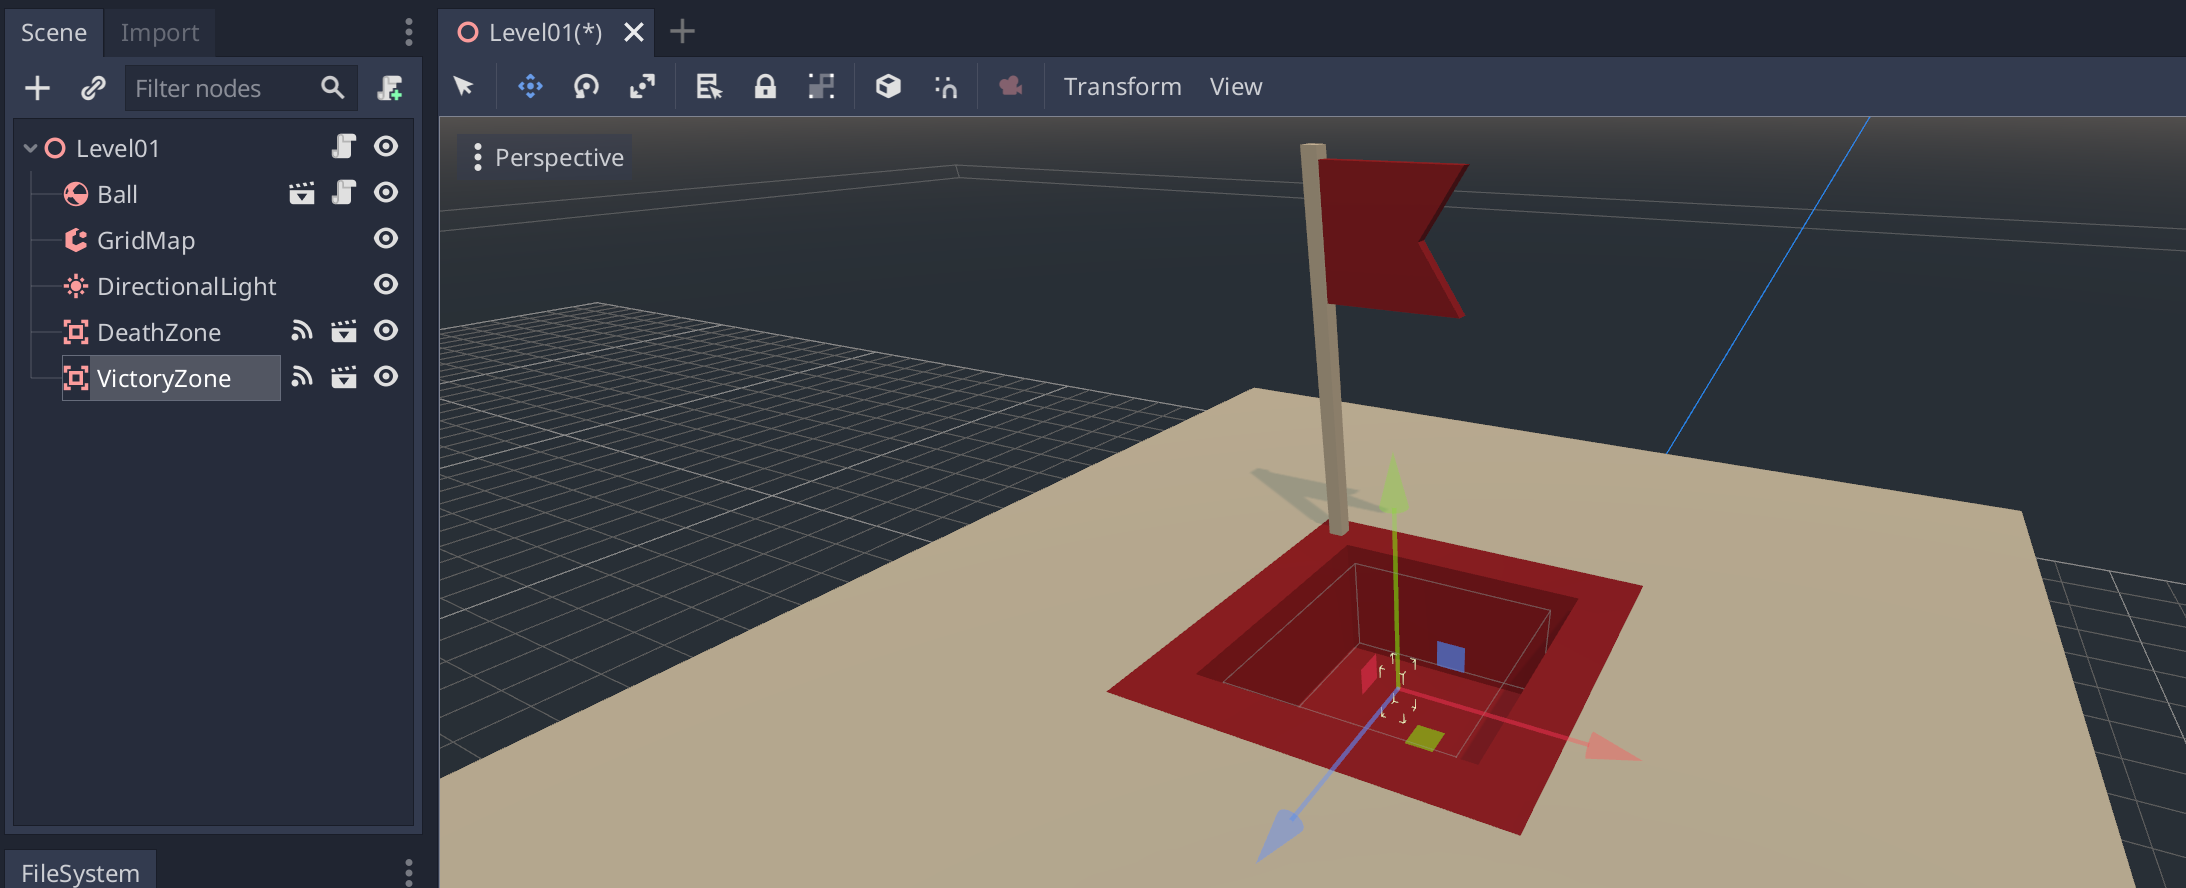
Just like with the DeathZone - create a new Area scene, name it "VictoryZone", add a Box collision shape, link it into the Level01, and place it where the Ball's target is:
And just like with DeathZone, we want to connect the body_entered signal from VictoryZone to Level script. As soon as the Ball enters the VictoryZone, we will run a function that moves us to the next level.
Add the following code to the Level.gd script:
var levels = [
    "res://Environment/Level01.tscn",
    "res://Environment/Level02.tscn"
]
export var current_level = 0

func _on_VictoryZone_body_entered(body):
    if body.name == "Ball":
        current_level += 1
        if current_level < levels.size():
            print("Load level", levels[current_level])
            get_tree().change_scene(levels[current_level])
Here we have an array of Levels, and as soon as the Ball enters the victory zone, we load the next level.
Now all you need is to make more levels. Save the copy of "Level01" scene as "Level02", and modify it to create a new level. Rename the root node from "Level01" to "Level02", and use the GridMap node to build a new level.
Notice that the root nodes of the levels (Level01, Level02, etc, all the ones that have "Level.gd" script attached to them) have the "Current Level" property in the Inspector panel:
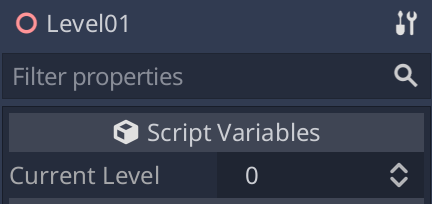
That's because the line export var current_level = 0 exported this variable and made it available in the Inspector panel. Level numbers start at 0, so in Level01 you'll want to set it to 0, in Level02 you'll set it to 1, and so on. That's how our script knows what level we're currently at, and at the line current_level += 1 it will increase this value by 1, so that it can take the next level from the list of levels here: get_tree().change_scene(levels[current_level]).
You can make as many levels as you want, and add them all to the array of levels.
Conclusion
I hope you found this tutorial interesting and useful! If you get stuck or confused while following this tutorial, or have any questions - make a post in our Discord Community, and I'll help you out.
I'd really appreciate any feedback, it would help me to make the future articles more useful to you. Please leave a comment, or feel free to send me an email at lumenwrites@gmail.com, or message me on Discord (lumen#7925).